Monthly Archives: September 2012

Eggs Without Shells

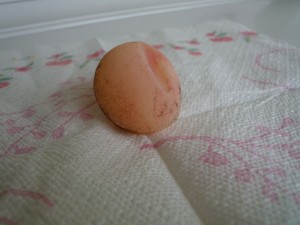
There’s never a dull moment in the garden. Petunia, the Barred Leghorn, surprised us by laying Frankenstein shell-less eggs on September 11th and 12th, leading us to wonder if something was terribly wrong. The eggs were translucent and appeared to have a considerable amount of blood in them. They were soft to the touch, buckling at the slightest pressure and were covered in a strange, dark, powdery substance.

We found each egg below the girls’ roost in their coop, making us wonder if Tuni had laid the egg during the night. We called our most knowledgeable chicken friends, consulted our chicken book, and searched the Internet for clues. We also did a thorough check of the girls’ vents to ensure there was nothing untoward happening. They both checked out fine. I looked the offending egg over with my hand lens, but the powdery grit still just looked like powdery grit.

Bottom line: it seems like she’s probably alright. While frequent laying of eggs without shells is cause for major concern and can indicate a serious illness according to Storey’s Guide to Raising Chickens, occasional naked eggs can show up if a chicken experienced a stressful event, is at the beginning or end of a laying cycle, or has a lack of calcium in the diet.

I’m pretty sure our chickens are covered where diet is concerned. It seems more likely to me that Tuni experienced a glitch at the end of a laying cycle. That said, I wasn’t able to find any references to the fine, gritty, powder on the eggs, nor did I find anyone describing eggs with a significant amount of blood in them (much more than the occasional spots I’ve seen before in fully formed eggs).

If it happens again soon, or lasts any longer, we’ll probably call the vet. In the meantime, after a day of rest, Petunia is back to laying perfectly respectable white eggs every morning.

Summer Hive Losses

The combined queenless colonies are dead. Despite reducing the hive entrance to discourage robbing, they were robbed silly by the other colonies in the neighborhood. I suspect that the queen cell we had spotted and were banking on was dead before we combined the hives. At any rate, it never hatched.

One of the previously hatched queen cells in Percy that must not have made it.

You can see evidence of robbing at the top of the frame. The robber bees chew up the wax to get to the honey, leaving it ragged looking.

I discovered this today when I dismantled the hive. I also discovered that for some reason the neighborhood bees hadn’t finished the job of robbing; there was a fair bit of capped honey above the brood comb that I whisked away to the basement freezer. There were also earwigs and small hive beetles. I found them skulking in wax crevices, and they ran from the glare of the sunlight.

A small hive beetle on a mission. Click to enlarge for a better view.

So what happened to the queens?

We don’t really know what happened to the queens in these two colonies. Percy was a good-sized swarm in early July, but its numbers started dropping quickly as the month wore on.

To be honest, I think they might have been just fine if I had fed them. We are still ironing out our beekeeping philosophy. Kelly and I had a long conversation about whether or not to feed Percy and decided that, although we have always fed swarms in the past, this did not reflect our intention to let our bees fend for themselves.

If a feral colony swarms late in the season and finds a tree cavity to move into there is no one refilling a jar of sugar syrup for them every few days. They sink or swim, and the continuation of their genetics depends on their ability to tough it out in whatever environment they find themselves. They are self-made bees.

Granted, feral colonies don’t have to contend with a couple of clumsy humans stealing their honey, either. We are manipulating our colonies and changing the course of their existence. So where do we draw the line? What is too much meddling, and what is appropriate?

If I had it to do over again, I would feed Percy. This is partly because I hate to see a colony die, but it’s also because I moved them about 14 miles from where they had swarmed. They arrived in my neighborhood relatively late in the season and with no geographical knowledge of where to forage. Maybe I’m making excuses for them, but it seems to me that this put them at a distinct, if temporary, disadvantage.

Package bees go queenless

The second queenless colony, April, started out as package bees this spring. They came from a bee breeder who supposedly takes special measures to ensure strong genetics. Specifically, she does not treat her bees and her packages contain queens bred from breeder queens that have survived at least two years. Unfortunately, the rest of the bees in the package are leftovers from almond pollination, leading me to wonder what diseases and pests they bring along with them.

This colony never boomed, though its numbers were decent through the spring and early summer. Dismantling the hive, I found no signs that April had tried to rear a new queen after the demise of their matriarch. It’s possible that we rolled the queen (killed her) during one of our summer hive inspections. This doesn’t explain, however, why the bees would not have tried to raise a new queen.

We used foundationless frames in April, and although there were some issues at first with cross- combing, the girls ultimately drew beautiful frames of wax with only the aid of glued-in craft sticks as a guide. The dark wax is brood comb, while the light-colored wax at the tops of the frames was used to store honey.


Stored pollen from April.

Mad About Fresh-Pack Pickles

Last year, in a bid to make my own version of our favorite sandwich fixing, I planted two Bushy Pickling cucumber plants. They cranked out a phenomenal number of cukes, and I soon found myself in desperate need of a pickle recipe.

I was too intimidated to try the traditional fermentation process, and too hell bent on a winter larder to opt for refrigerator pickles.  Instead, I chose the middle path: fresh-pack pickles. But, before we go on, a novella on canning safety.


Botulism prevention, the name of the game

I have hesitated in the past to share canning recipes or information because of the serious safety concerns that go along with home canning. Botulism is a bacterial nerve toxin that can crop up in improperly canned foods. Low acid vegetables are especially prone to botulism contamination and pressure canning is used for this reason. I don’t own a pressure canner, so I am more limited in the types of foods I can, and I take care to follow recipes from reputable sources and make my canning process as hygienic as possible. The CDC has a helpful and very sobering page with information on botulism here.

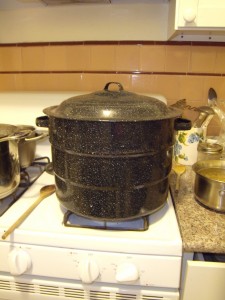
Water bath canners are not suited for canning low acid vegetables.

I learned to use a water bath canner in my grandmother’s kitchen. She was a stickler for hygiene, but I never saw her use a recipe, or refer to a list of CDC guidelines. I’m sure many people can this way, and many people get away with it. However, don’t take my word for anything. If you are new to canning, educate yourself on the dos and don’ts and avoid even the most remote possibility that you will seriously injure or kill yourself or a loved one. I don’t mean to be overdramatic here, but I really do believe in the importance of taking safety risks seriously when canning.  Here is a link to the USDA Complete Guide to Home Canning.

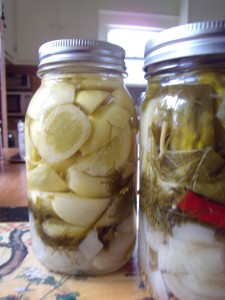
Fresh-pack dill pickles

The original recipe that I stumbled across last year in my quest for fresh-pack pickles is courtesy of Duluth Community Garden Program. My take on the recipe was such a hit in our pickle-crazed household that I resurrected it for this year’s round of pickling.

As with any canning project, proportions are essential for safety reasons. I don’t mess with the balance of acidity, sugar, and salt in recipes, because these ingredients are essential for staving off dangerous bacterial growth in home canned foods. I do, however, love tweaking flavors. In that spirit, here is our favorite fresh-pack pickle recipe:

Dill pickle ingredients:

  • Pickling cucumbers between 2-1/3 and 3 inches long (or larger cucumbers cut to size)
  • Yellow onion sliced ¼ to ½ inch thick
  • Garlic cloves
  • Carrot slices
  • A generous wad of dill weed, or a handful of dill seed
  • A handful of mustard seed
  • Fresh grape leaves (if you have them. They help keep the pickles crisp, and they’re tasty, too.)
  • Hot peppers (also optional)

Brine ingredients:

  • 2 cups white vinegar (4%-6% acidity),
  • 6 cups water
  • 1/3 cup canning salt (kosher salt)

Make the pickles:

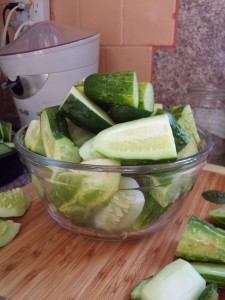
  • First, gently scrub the cucumbers to remove spines. This is most easily done just after picking, and it’s important to make the pickles right away to prevent mushiness. Kelly says time of harvest is also important. Cucumbers picked and canned early in the morning will be more crisp than those picked later in the day.
  • While you’re working, sterilize jars and lids per canning jar instructions.
  • Prepare all other ingredients—cut large cucumbers to size and taste for any bitterness, slice onions, peel garlic cloves, and wash dill, peppers, and grape leaves.
  • Combine brine ingredients in a large pot, stir, and bring to a boil. Depending on how many cucumbers you have, you may need to double, triple, or even quadruple the brine recipe. My last batch of pickles used 4.25 lbs. of cucumbers for a total of seven quarts, and I almost used up my triple batch of brine. The original Duluth recipe is way off when it asserts that one batch of brine is sufficient for six quarts of pickles.
  • Remove hot jars from water bath and add ingredients, stuffing cucumbers in last.
  • Using a canning funnel, ladle boiling brine into jars and fill to within ½ inch of rim.
  • Wipe rims with clean paper towels.
  • Place hot lids on jars and screw closed finger tight.
  • Return jars to not-quite-boiling water (you don’t want them to break!) and turn the heat up all the way.
  • Process for 10 minutes, counting the time from when the water returns to a simmer.
  • Remove jars from water, placing them on a wire rack, board, or, if you’re like me, a towel on the living room floor. Do not disturb the jars or tighten the bands for 24 hours.
  • Endeavor to wait a respectable length of time before you begin devouring all the pickles! (You should wait at least a week for the pickles to soak up the briny goodness.)

The cucumber plants are looking a little worse for wear at this point in the season, but I’m crossing my fingers for one more batch of pickles.