One of the by-products of my plum juicing was a few pounds of skin, pits, and pulp with some juice to spare. While I researched plum wine recipes, one of the simpler ones I encountered was Japanese Plum wine, or Umeshu, more like a cordial or liqueur with no yeast and racking involved. While it calls for unripe Ume plums, a traditional Asian plum on the sour side with low juiciness, the recipe suggests Western plums, apricots, and quince might substitute nicely.
For us gardening nerds, Ume plums are the fruit of Prunus mume, which in this hemisphere is known as ‘flowering apricot,’ and which is the mother of several cultivated varieties, such as the once-popular ‘W.B. Clarke,’ a beautiful weeping form. In my early gardening years in Oregon, these small, flowering trees burst out in pink to white bloom in the late winter rains of the Willamette Valley.
Not wanting to waste the pulp, I decided to see if I could make a not-so-traditional Umeshu wine with it. While I wasn’t able to find rock sugar, I found the shochu recommended in the recipe. This is a clear alcohol, typically between 25 and 42 proof, commonly distilled from sweet potatoes, barley, rice, buckwheat, or some other grain. I found one made from barley, 48 proof, in the ‘Vodka’ section of a chain liquor store.
Everything I ever learned about math I have forgotten
I weighed my pulp to calculate the right proportion of cane sugar. The recipe calls for a ratio of 1 pound plums to 1 pound sugar for Ume wine. Since I used Santa Rosa plum pulp, I decided to use less sugar, roughly following the 60% plum and 40% sugar recommendation. Since my math skills leave much to be desired and I am a terrible record keeper, I suspect I weighed the plums, then halved the weight and added that amount of sugar plus some so that the sugar weighed about three-quarters what the plum pulp had (eg, if I had 6 pounds of pulp, I added 3 pounds of sugar, plus about 1 pound. See what I mean?).
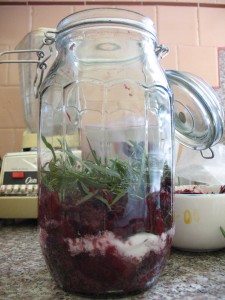
I used a 2 1/2-quart jar with a rubber gasket lid, layering the plum pulp with the sugar. I decided to add fresh tarragon from the garden for a twist, placing five or six 4–6″ sprigs in two of the three layers. I finally covered it all with shochu.
Since we had a small Santa Rosa plum harvest, I decided to also make a batch of plum liqueur with whole plums, more like the recipe. For this batch, I used a 2-quart mason jar with a screw-on lid. I again used the 60% : 40% recommendation, or something close. I also added 4 chunky stems of lemongrass from the garden in one of the layers. Since the recipe states that the jar should only be filled halfway, I did so, then added the shochu to cover the plums et al.
Ch-Ch-Changes
For the record, I should share a few modifications. First, because the plum pulp was so dense, and I could see air pockets in the jar, I decided to shake the jar after a few days to dissolve some of the sugar so that the shochu could penetrate to the bottom. This dissolving might have happened on its own, but I tend to worry a bit, so I facilitated the process.
Second, after about a month, I ended up adding more shochu to both jars. In the mason jar with the whole plums, a bit of mold formed on a part of a plum above the level of the shochu. I opened the jar and removed the mold, then added more shochu, so that it was well above the level of the plums, to about the 3/4 mark of the jar. I also changed out the lid for a new one. To be safe, I added more shochu to the other jar, too, nearly to the top. Throughout the next five months, I shook the contents of both jars gently to guard against further mold growth. It seemed to work. Neither jar exploded, as the author has experienced.
Five months later
A few weeks ago in mid-January, I strained the contents of the plum pulp liqueur. I used a fine mesh bag that I had used to juice the plums, and ‘milked’ the contents into a bucket and bottled it. This batch is amazingly jammy and velvety, and has quite a bit of sediment, which I am ok with. We couldn’t taste the tarragon at all. I probably used too little, since I was worried about an overwhelming taste or bitterness. Next time, I might lightly bruise it. In this batch, the ratio of solids (plum, sugar) to liquids (shochu) was roughly visually equal.
I then strained the other batch, made with whole plums. Again, we could not taste the lemongrass. If I were to use lemongrass again, I would lightly crush it. Since this batch had a significantly higher ratio of alcohol to solids, we had to take a few tastes before deciding we really liked it. The shochu imparts a little sweetness, but the plum taste comes through, less jammy, but fruity nonetheless. This batch, too, has quite a bit of sediment. I suspect that if I had not squeezed out nearly every drop of liquid in both batches, the sediment might not have made it through the bag’s filter.
Unscientific conclusions
In both batches, the sugar content did not detract from the fruit’s flavor, but I would still add less next time, say, half or one-third the weight of the fruit. Santa Rosa plums have a nice balance of sweet and tart, which I would like to experience more in the liqueur. And I am going to use this rough fruit to sugar ratio in the next liqueur recipes I’m dreaming up. I hope the ratio is rather universal, and not specific to plums, apricot or quince.
The success of the plum pulp liqueur suggests that it may be possible to use fruit debris left over from other projects to make a liqueur; I even thought of reusing the pulp just to see what kind of flavor I would get on a second generation batch. But I decided to move on to the next creation.
I have been bitten by the liqueur bug.

