Category Archives: DIY

Lessons in Vinegar Making

As I write this, five jars of red and white wine vinegar and their vinegar mothers sit in jars in the kitchen, working away. I grew all of the vinegar mothers from scratch last summer, experimenting with various mixtures of grape mash, water, sugar, and honey.

Last August, I wrote about the confusing and contradictory information on making homemade vinegar. I fretted over whether my batches of vinegar from store-bought mother and from scratch would turn out. Vinegar making seemed like a strange and complicated science experiment.

9 months later, I can say with conviction that vinegar is indeed a wild science-y miracle as, I suppose, are most culinary and propagation endeavors. But making vinegar is also pretty easy, requires little time on the human’s part, and produces fabulously tasty results.

Here are the most important lessons I’ve gleaned from my first 6+ rounds of vinegar:

  1. Fruit flies rock. I initially read conflicting opinions on the importance of allowing fruit flies to colonize the vinegar concoction when one is trying to raise a vinegar mother from scratch. Short answer: almost all of my jars of fruit, water, and sweetener quickly grew beautiful vinegar mothers in the presence of swarms of disgusting little fruit flies. The flies’ magic comes from the vinegar-making bacteria on their feet. Once you have a vinegar mother established, there’s no need to include fruit flies in the jar for future batches of vinegar.
  2. Making white wine vinegar is harder than making red wine vinegar. Virtually all of my red wine vinegars taste amazing. Not so with the white wine vinegar. The mothers appear less robust, and the vinegar sometimes tastes a little ‘off’. Maybe I’m still acquiring my taste for the real deal? Since white wine is higher than red in naturally occurring sulfites, it’s more difficult for the Acetobacterium that turn wine into vinegar to flourish. I generally use wine that has no added sulfites for this reason, but have found that my vinegar mother readily turn ‘regular’ red wine into vinegar with no problem. Perhaps the subprime Acetobacterium conditions caused by the higher sulfites in white wine also explain why my white wine mothers have been more prone to molding. But more on that next…
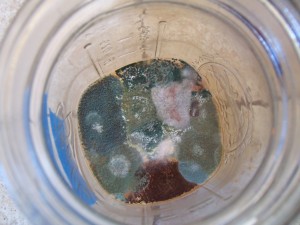
  3. Neglect your vinegar mothers too long, and they will mold. After bottling finished vinegar in December and feeding the mothers their wine/water mixture, I got busy and didn’t tend to the jars until mid-April. While the majority were still doing fine, some of the smaller jars of white wine vinegar had grown flamboyantly colorful mold patches and had to be thrown out.
  4. One of my biggest points of confusion when I started this project was how long it takes for the mother to turn the wine into vinegar. I now know that it takes about a month for a new layer of mother to form on top of the wine, indicating that the vinegar is ready for consumption. Timing definitely depends on the size of the mother in relation to the amount of liquid you add. It will take a small mother longer to digest the alcohol in a comparatively large amount of wine. However, once your mother has finished her first batch of wine in a given jar, she should be able to complete the next batch in the same sized jar in about a month.
  5. Darkness isn’t required for vinegar mothers to do their thing. As with most of my projects, I’ve become lazier and relaxed my standards over time. In the beginning, I thought vinegar mothers needed total darkness to be happy. These days, my ladies live in glass jars on top of the refrigerator (for warmth), and I’ve scrapped trying to swaddle them in towels to keep them in the dark. They’re growing just fine.
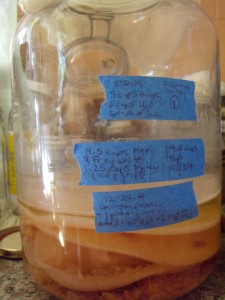
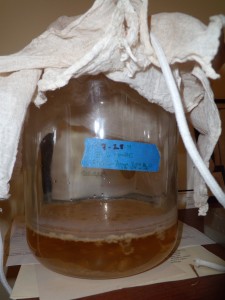
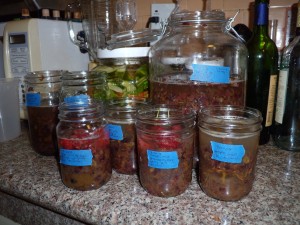
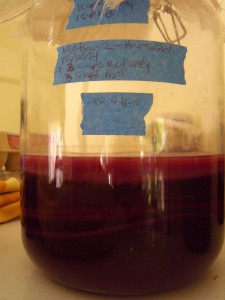
My happiest (and only remaining) white wine mother. I keep my 'vinegar records' written on painter's tape on the sides of the jars.

My happiest (and only remaining) white wine mother. I keep my ‘vinegar records’ written on painter’s tape on the sides of the jars.
DSCN0255

I love the layers of mother that build up in the jar over time. If I were in the business of maximizing my vinegar production, I would be diligently dividing these pieces of mother to start new production jars.

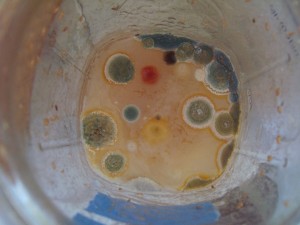
The white wine mothers produced the most interesting mold colors.

The white wine mothers produced the most interesting mold colors.

A few of the reds molded too.

A few of the reds molded too after months of neglect on my part.


Home-Grown Vinegar

The homemade vinegar experiments have been sitting undisturbed in the darkest room in the house for almost three months. This is partly because it takes a while to make vinegar and partly (mostly) because I am really really busy with less interesting things.

I had an unexpected extra day off this past weekend and finally responded to the nagging voice in the back of my mind that’s been urging me to check up on the vinegar.

There’s bad news and good news. The bad news is that my store-bought white vinegar mother grew a nasty blue-green mold layer, as did three of my smaller jars of fruit scrap vinegar. I poked around briefly online and came to the conclusion that there’s no way to salvage a vinegar mother once she’s gone moldy. Bummer.

Because her gelatinous floating mass still seems perfectly alive, I’m having a hard time doing anything to actively dispose of her. A flush down the toilet seems vaguely cruel, as does tossing her into the compost pile. Instead, I’ve taken the passive route of putting her container in full sun on the back stoop–a move I guiltily suspect will also kill her. I never expected to get so emotionally invested in Acetobacter.

In the meantime, fabulous, magical, scientific things have happened in the other jars. In the largest jar of grape mash, a beautiful thick mat of vinegar mother formed on top of the grape skins and liquid. After I’d finished worshipping her, I tore this mother into multiple pieces and placed her in new jars with various concentrations of white and red wines. The experimentation continues!

A side view of the grape mash with a layer of vinegar mother at the top. You can see fruit flies stuck in the mother. See below for more on the role they play in the vinegar-making process.

A side view of the grape mash with a layer of vinegar mother at the top.

Vinegar mother--the view from above.

Vinegar mother–the view from above. You can see fruit flies stuck in the mother. See below for more on the role they play in the vinegar-making process.

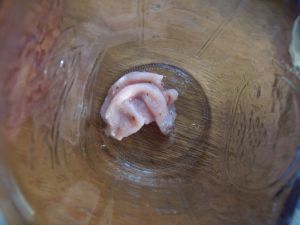
A piece of vinegar mother in a new jar.

A piece of vinegar mother in a new jar.

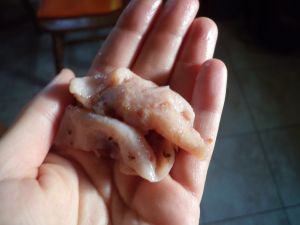
And up close, in my hand.

…And up close, in my hand.

The vinegar from this largest jar is delicious, very sour, with a complex flavor and a strawberry-lemonade hue.

The other three small jars of fruit scrap vinegar didn’t make mothers, but the liquid has definitely turned to vinegar. Maybe they need more time? Or maybe the liquid was a little too low? I added distilled water and wine to these jars as well and will wait with baited breath for new developments.

Grape mash vinegar mother recipe:

  • 5 cups mashed (juiced) grapes
  • 5 cups distilled water
  • A ‘splash’ of fresh grape juice
  • 2 spoons honey

Combine ingredients in a 1-gallon jar and leave uncovered for 24 hours. Then, use a rubber band to secure cheesecloth over the mouth of the jar and place in a dark warm room (my room honestly isn’t that warm, but I hear warmth is ideal for vinegar production). Leave untouched for about 3 months.

I made this recipe up, and the results were far beyond my expectations. I imagine any number of variations might also yield success.

Grape mash recipes that produced vinegar but no mothers (yet):

  • 1 cup grape mash
  • 1 cup distilled water
  • 1 cup honey

Notes: A pleasantly sweet and tangy vinegar

  • 1 cup grape mash
  • 1 cup distilled water
  • 1 cup white sugar

Notes: This one is a little too sweet for my taste, but definitely still vinegar-y

  • Unmeasured amount of grape mash (1 cup?)
  • Unmeasured grape juice (1 cup?)
  • unmeasured quantity of whole strawberries and raspberries (1/2 half cup?)
  • 1 tsp white sugar
  • Distilled water to cover

Notes: Very tasty, with berry flavors coming through

A note on fruit flies

I left my jars of grape mash uncovered for a day to allow fruit flies to get inside and jumpstart the process. From what I’ve read, fruit flies carry Acetobacter–the genus of bacteria that turns ethanol into acetic acid, or vinegar–on their feet and in their bodies, thus inoculating the mixture and increasing the chances that a good mother will form.

There’s no way around it: a jar of fermenting fruit with a captive cloud of fruit flies emitting a tiny buzzing sound beneath the cheesecloth cover is pretty disgusting. Even more gross is taking off the cheesecloth three months later and releasing a crowd of fruit flies—the great- great-grandkids of that first colony. Whatever works, though, you know? The vinegars in all of the non-moldy jars taste great and the mother was something to behold.

I’ll be interested to see the difference between the white and red wine batches I’ve started with pieces of vinegar mother, as well as whether the smaller jars will end up forming mothers of their own. The grape mash I used back in August was from Flame grapes, a table grape that Kelly assures me is neither a red, nor a white ‘wine grape’. Will the mothers have a wine preference? Stay tuned.

Homemade Vinegar From Scratch and From Vinegar Mothers

I’m making vinegar from scratch. I hear it’ll be delicious—the best vinegar I’ve ever tasted. But honestly, I don’t really know what I’m doing, and no one else seems to either.

It’s not that there aren’t zillions of blog posts out there with recipes for vinegar, not to mention how-to videos on You Tube. It’s just that everyone says—with a great deal of conviction—something different.

For instance, is small batch home vinegar ready in a week? Should you taste test for done-ness daily beginning at week three or four? Or does vinegar definitely take three to six months of undisturbed development? And likewise, does one casually add wine along the way to continue feeding the vinegar mother, or is it imperative to leave the whole concoction undisturbed for months on end?

How, exactly, does one know when one’s vinegar is ready for consumption? And, as one scans the froth anxiously for dreaded molds, how does one distinguish said molds from the healthy layer of scum created by a robust mother?

Then there is the question of what approach one takes to the vinegar making process.

Should I begin with a store-bought mother and some leftover wine? What about seeding fruit scraps with some unpasteurized commercial vinegar? Or growing a mother from wild bacteria by combining sugar (or honey?!) with water and fruit?

Are the corpses of fruit flies essential ingredients in the vinegar mother-making mix due to the bacteria on their feet, as one popular video claims? Or, as Kelly sagely pointed out, are the many local airborne bacteria and those naturally present on the skins of all fruits enough to inoculate the mixture?

All of these questions have made me hesitant to take the leap into the science experiment that is vinegar making. I’ve been perhaps unreasonably perturbed by the lack of clear, definitive, comprehensive instructions and explanations on the topic. But maybe, as I’m now trying to convince myself, the very wide array of information on home vinegar making simply indicates that there are many right ways to make vinegar. Here’s hoping.

In an attempt to increase my odds of turning out a favorable result, I made a variety of concoctions.

First, about a month ago, I started a batch of white wine vinegar using organic wine without added sulfites—apparently important so as not to impede the growth of vinegar-making bacteria—and a white wine vinegar mother, purchased for a pretty penny at the same boutique-y farm supply store at which I purchased my Perfect Pickler.

One month in, the white wine vinegar smells like vinegar, and the mother, a layered, fleshy looking mass, has grown considerably. Although it smells respectable enough, I haven’t touched or tasted it because the label on the mother’s bottle said it would take three to six months to become vinegar.


My white wine vinegar mother hard at work (the main gelatinous mass of mother is actually not visible in this picture. She is under the surface of the wine/vinegar).

My white wine vinegar mother hard at work (the main gelatinous mass of mother is actually not visible in this picture. She is under the surface of the wine/vinegar).

While my store-bought vinegar mother is busy digesting alcohol in semi-darkness, I’ve been considering trying to grow my own mother from whatever unseen bacteria abound in our neck of the woods.

Today, Kelly got busy juicing grapes to make mead, and I couldn’t resist taking a stab at grape pulp vinegar. Why not? There are plenty of recipes out there for apple and pear scrap vinegars.

Now, a few hours later, I’ve got seven jars of someday-fingers-crossed-delicious-vinegar on the kitchen counter. I’m especially excited to be experimenting with regard to proportions, sugar vs. honey vs. no added sweetener, etc. I even threw in a few strawberries and raspberries to some of the jars.

Vinegar galore--with pickles in the background.

Vinegar galore–with pickles in the background.

I have dutifully left the jars sans cheesecloth for the night, just in case fruit flies really are the key to successful vinegar.

Can one make vinegar without also making a mother? This is another of the many questions I still don’t have an answer to–some of the recipes I found don’t even mention a mother, while others require that one begin with a mother.

I’m hoping that mothers develop in at least some of these jars. Aside from their practical utility, there is something so otherworldly and deep-sea creature/disemboweled organs-grotesque about them. They’re revolting and magical all at the same time. And that name!


Little Free Library Meets Community Seed Exchange

Over a year ago, I stumbled across my first Little Free Library. It was just a glass-fronted box with a roof in somebody’s front yard, and it was full of books. A sign on the side read, “Take a book, return a book.” I thought it was just one person’s cool idea. Little did I know it’s a worldwide project. As soon as I searched the Internet, found the website, and saw the world map dotted with locations of tiny libraries, I wanted one to nestle into our (future) front yard garden.

I love books, and I love the idea of people in our neighborhood stopping in front of our house to pick a book out of the library, and perhaps return one of their own.

More recently, I’ve been toying with the idea of adding a curbside seed exchange to this vision. Kelly and I are committing ourselves this year to growing only open pollinated seeds and saving them in a more organized and intentional manner for future planting. Why not invite our neighbors to share our seeds and offer their own? Combining a library and seed exchange seems, somehow, very appropriate.

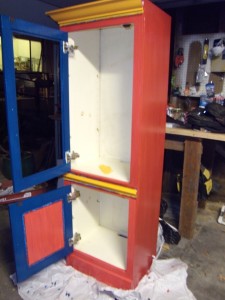
It was only this week that I made a trip to the thrift store with my dad, not really expecting to find the perfect library/seed exchange vessel, but hoping. And there it was: $5 and covered in dirt (I hope it was dirt, anyway!). The cabinet is a little bigger than I’d imagined, and I wobbled home with it protruding from my hatchback. Fortunately, some neighbors took pity on me and helped carry it to the garage.

This is going to be a library in my front yard, I told them. You should come back and check it out. I’m not totally sure they got it, but they smiled at me before retreating across the street.

Now for layers and layers of bright paint. I am trying to be patient, as I wait for paint to dry and ruefully inspect yet more accidental drips that will require yet more layers of paint. Egad.

Picture me at 10:00pm in clogs and Carhartts painting by the light of Kelly's headlamp and the dim overhead garage bulb. That's how crazy and excited I am.

Picture me at 10:00pm in clogs and Carhartts painting by the light of Kelly’s headlamp and the dim overhead garage bulb, and fretting over whether ‘Candy Apple Red’ and ‘Tropical Sky’ really go with ‘Mango Madness’. That’s how crazy and excited I am.

When the new little garden library is ready for its debut, Kelly insists we should distribute announcement flyers to neighbors and invite them to a grand opening reception. I feel slightly foolish, but I do secretly hope that at least some of them will be as delighted as we are by this addition to the neighborhood.

How to Make Loquat Liqueur

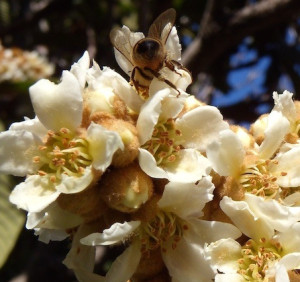
Honey bees love loquat blossom nectar as a winter food source.

Honey bees love loquat blossom nectar as a winter food source.

Our loquat harvest was incredibly small last summer, and something special seemed to be required. Rather than make loquat jam with so little fruit, I made liqueur this year, using the entire harvest – 4 1/3 pounds of fruit.

Liqueur making takes patience and it felt a long way from summer when I finally bottled the loquat liqueur this chilly morning. Small though my sips were, I can say it’s one of my favorite liqueurs that we’ve made so far. The flavor is subtle, but sweet and well-rounded.

I’ve started using shochu, or Japanese vodka, for most of my liqueurs. It doesn’t have the alcoholic punch of vodka (it’s 48 proof, compared to 80 proof vodka), and its very slight sweetness makes it compatible with most fruit. Read on for my original recipe and notes.

Loquat Liqueur ingredients

• 4 1/3 pounds loquats, washed, flower end removed, halved and pitted to yield 2 pounds of fruit

• 1 cup sugar

• 1 large handful of green coriander sprigs

• 1 750ml bottle shochu

Loquat Liqueur directions

1. Put fruit, sugar and coriander sprigs in jar and add shochu. Shake until sugar is dissolved.

2. Store in a cool, dark place, and continue to shake occasionally over 6 months. Discoloration of the fruit is normal, but watch for mold (I didn’t have any problem).

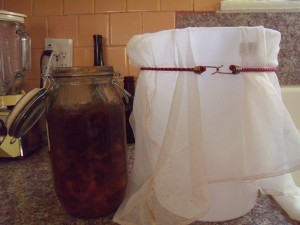
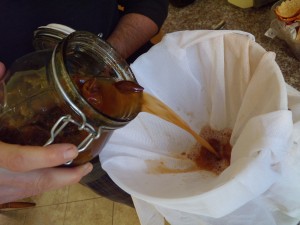
3. After 6 months, secure cheesecloth to a container, and strain liqueur through cheesecloth. Allow fruit solids to sit in cheesecloth overnight.

4. In morning, remove cheesecloth and gently squeeze into the container.

5. Bottle liqueur.

Additional tips for homemade liqueur

1. In my original recipe, I used a medium handful of green coriander sprigs (cilantro plants gone to seed, before seed dries). I’ve increased the measurement here because I can’t really taste the coriander in the liqueur, and I’d like to. Next year, I’ll increase the amount of coriander. You can leave out the coriander, or substitute a different spice or herb.

2. I actually used one bottle of shochu plus about 1/8 of another bottle, which was leftover from some other liqueur project. Obviously, you can adjust the quantity of shochu and sugar, depending on how much loquat fruit you have on hand. When I first started making liqueurs, I aimed for a 2:1 ratio of fruit to sugar (by weight). I’ve since been experimenting with less sugar, and with honey also. I then add alcohol to fill whatever jar I am using.

3. Be sure the lid to the jar has a good seal. If it doesn’t, add plastic wrap on the inside of the band before closing. This helps prevent mold, though it isn’t common for mold to form in the presence of alcohol.

4. You can use cheesecloth or any similar type of cloth or bag to strain the finished liqueur. The tighter the weave, the better: this helps strain out the sediment.

5. I let my liqueurs steep for six months. When I made my very first plum liqueur, the recipe called for six months. The results were awesome. I’ve followed this timeframe ever since. You might be able to subtract some of this time for other fruits, but I wouldn’t with loquats. They have a very subtle flavor, and the timing allows for maximum flavor extraction.

Just before straining.

Just before straining.

DSCN0014

This is what loquats and coriander look like after six months in shochu.

Loquats and coriander after six months in shochu. We usually discard the fruit after straining.

 We make lots of other yummy home alcohols, and you can too! For instructions on how to make plum wine, check out our post, Homemade Plum Wine Results; for additional tips and tricks (this year’s batch is based on that first recipe, but is turning out much tastier!) check out Homemade Plum Wine, 2013; to learn about the hands-down yummiest plum liqueur on the face of the earth, take a look at Not-Traditional Umeshu.  

Really Simple, Low-Tech, Do-It-Yourself Washing Machine Gray Water

We like the idea of installing a gray water system, but we have lacked the plumbing smarts, financial resources, and home ownership (we have to run everything by the landlord) to make it a reality.

Now, however, due to a sewer backup, we are on our way to gray water bliss.

Let me explain.

A few weeks ago, while running a load of laundry in our hand-me-down water-inefficient washer, the toilets began making ominous gurgling noises, and sewage backed up into the shower. After calls to a plumber and the city, we thought the problem was fixed.

Last weekend, another load of laundry started the toilets gurgling and sucking all over again. Rather than tempt fate, Kelly stopped the load. But we really needed to finish the wash. And it was then, in a characteristic streak of brilliance, that Kelly landed on a solution that achieved both peaceful sewers and nearly 200 gallons of salvaged gray water (so far!).

I have to stop here and assure you that, as brilliant as she is, Kelly is no plumber. Neither does she have any special engineering or ‘handy-man’ training. This is really really simple, and if you’re in our position—hankering for gray water, while balking at the expense, trouble, etc.—you should give it a try!

How to make a (temporary) washing machine gray water system in five minutes

Materials (highly variable and flexible depending on your needs and what you have laying around): Length of four-inch PVC pipe, two flexible rain gutter extenders, two 96-gallon plastic garbage containers (with lids), one five-gallon bucket, bricks/cement blocks/wood as needed.

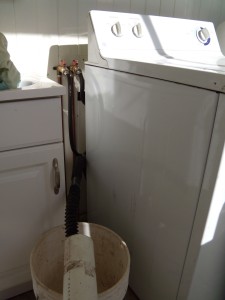
1. Remove the ‘drain hose’ (i.e. the rubber hose that comes from the back of your washer) from where it disappears into a hole in your wall.

The black drain hose can be seen here extending over the rim of the bucket and inserting into the white PVC pipe.

The black drain hose can be seen here extending over the rim of the bucket and inserting into the white PVC pipe.

2. Insert the drain hose into a length of pipe (ideally, a non-flexible pipe long enough to make it outside without further connections). We used a length of four-inch PVC pipe that measured about 7-8 feet long. We positioned a five-gallon bucket under the ‘connection’ between the pipes (drain hose jammed into PVC). This way, any leaks would go into the bucket rather than onto the floor (there were no leaks!!!).

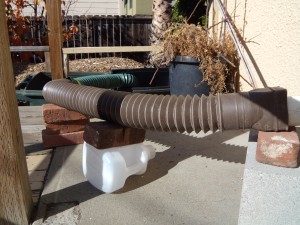
3. We attached two flexible rain gutter extenders to each other and connected them to the end of the PVC pipe to add necessary length and make some turns. We fed the end of the last flexible rain gutter extender into an empty garbage container.

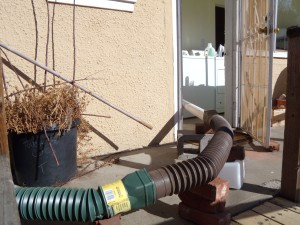
The PVC pipe is on the far right-hand side of the picture. From there, the flexible rain gutter extenders   complete the distance to the just-visible water receptacle off the edge of the porch. We may have an advantage in this regard, as our house is high off the ground.

The PVC pipe is on the far right-hand side of the picture. From there, the flexible rain gutter extenders complete the distance to the just-visible water receptacle off the edge of the porch. We may have an advantage in this regard, as our house is high off the ground.

4. We arranged stacks of cement blocks and bricks under different portions of the piping to ensure that all of the piping went downhill from the washer to the garbage container turned gray water receptacle.

And from another angle...

And from another angle…

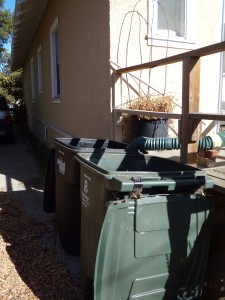
The bins, filling up!

The bins, filling up!


Homemade Plum Wine Results

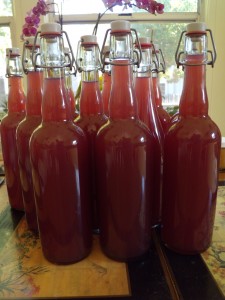
The prize.

The prize.

We finally bottled my plum wine a few weekends ago, and for a first batch, it was actually drinkable. Strong as hell, not the tastiest, full of room for improvement, but drinkable.

Strong as hell

I did two fermentations. Twenty-four hours after the campden tablets dissolved, I made a sugar solution in a quart jar with 2.25 pounds of sugar, 16 ounces warm water, and plum juice and stirred it into the juice in the bucket. I then made a yeast solution (with champagne yeast, recommended for fruit wines) and added that.

When the yeast activity slowed, about 12 days later, I transferred the liquid to a carboy, and did another fermentation with the same recipe of sugar solution. This means I added 4.5 pounds of sugar to 4 gallons of straight plum juice. The wine then sat for about 4 months in the carboy.

When I siphoned the stuff into the bucket for step one of the bottling process, just having it in my mouth gave me a gentle buzz. When I had a less-than-8 oz glass with dinner that night, the buzz did not seem alcoholic as much as it seemed other-drug-like. Relaxing and pleasant, nonetheless.

Not the tastiest

Sarah and I both have a sweet tooth, and this wine is sour. It has a nice fragrance and does not smell vinegary, but it is sour. We experimented by adding sugar to the desired sweetness. This made the wine more palatable, but if it weren’t homemade, I can’t honestly say I’d be drinking it. I sent a bottle off to Richard, my plum wine-making mentor, who prefaced his responding email, ‘DO NOT DUMP THIS WINE!’ He’s very positive. He thought the wine was too acidic, but has good color and is decent for a first attempt.

In the meantime, after we bottled it, I discovered all kinds of online literature that pointed to sweetening wine before bottling it, but cautioned that the yeast may undergo another round of activity. A home-brewing friend said champagne yeast is rather notorious for behaving this way and suggested sweetening after opening the bottle.

Full of room for improvement

1. I don’t even really like champagne or other dry wines. And the back-taste of champagne is quite present. I think I’ll research other suitable yeasts.

2. The plums weren’t necessarily ripe. The tree had been stripped clean, plum ready or not. I think I’ll opt for ripe fruit next time, or a bit overripe, or some combo.

3. Yes, I will add more sugar.

4. But I think I’ll taste-test more along the way, too. Doh!

5. Did I let the wine sit in its yeast debris too long? Maybe I should have siphoned it off, then let it sit. I remember Richard saying he strained before letting it sit for a few months.

Drinkable

It is. It has a great color and clarified nicely (an attribute of champagne yeast apparently). It isn’t horrible, it’s just not as good as it could be. I think I have 10 bottles. I used it to cook a pork roast one night. The more applications, the better, I think.

Cheers!

Pre-siphoning. The wine clarified nicely.

Pre-siphoning. The wine clarified nicely.

Bottling the wine after siphoning and filtering.

Bottling the wine after siphoning and filtering.

 We made improvements in our 2013 plum wine! Check out Homemade Plum Wine, 2013 for details. If you want to try making the best plum liqueur we’ve ever tasted, read up on Not-Traditional Umeshu.