I drove north in mid-October to visit dear friends and to harvest olives. I was actually a little late. Many of the olives in the surrounding towns had already turned black, but I was lucky to find a few pockets of green olives on my friends’ trees.
For lye curing, green olives work best. Those that have started to turn, with patches of grey or yellow-green, or those that are grey-green, work well also. The blacker the olive, the more ripe it is, and the more likely it is to fall apart during a lye treatment.
This is my third year curing olives, and my second using lye. The first year, I couldn’t find lye locally, so I tried the dry salt curing method. It took well over 3 months, many of the olives rotted, and the final results were quite intense. The flavor of the olives was extremely concentrated, and for me, unpalatable.
Last year, I wised up and bought lye in olive country, at the local hardware store, before heading home. The store had a huge end-cap display. As I approached, the friendly sales guy said, ‘Ah, curing olives?’
A note about lye: It is a caustic chemical, and can burn skin and eyes on contact. Follow directions about handling and disposing exactly. And while it’s the active ingredient in Drano, it’s not the only ingredient. If you can’t find lye, do not use Drano to cure olives.
I’ve been working with a very old Extension recipe for home-cured olives and decided to see if it had been updated. It had, and it had been greatly expanded, too (see new recipe here) (Note: This link appears to be unstable. Keep trying if you get gobblety-gook; it should work at some point!)
Here’s my 21-step process, recipe and tips included. Thanks to Sarah for her marvelous editing, breaking down the process to make the instructions very clear and easy to follow.
Sorting the olives
1. Cull any bruised, mushy or otherwise subpar olives. For home-curing, olives mildly affected by olive fruit fly are fine. According to UC Davis, a bad infestation will cause your fruit to rot, so curing right after harvest may impede rotting. I found about 1/5 of last year’s harvest affected, and I culled the most damaged olives. I discovered, however, that one or two holes left by larvae on less damaged olives allowed for quicker penetration of the lye, so this year, I left them. These olives turn out softer, which I like. You may also need to sort olives by size, since olives of differing sizes will absorb the lye at different rates. My olives were all the same variety and pretty much the same size.

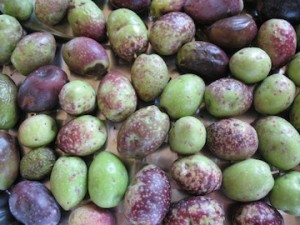
Culled olives. One of the trees had a heavy scale infestation, which you can see as little orange specks on the olives (click on picture to enlarge). Other olives were wrinkled, dark, or had sunken spots.
Olive lye soaks, step-by-step
2. Transfer to a container with a built-in spigot, like a cooler or a brewing bucket. The container should be food-grade plastic.
3. Use a quart jar or gallon jug to begin filling the bucket with enough water to cover the olives by an inch or so. Keep track of how much water you’ve used to fill. This amount determines how much lye you use (and later, how much salt).

Olives covered in water in brewing bucket, ready for round one of lye.
4. When you determine how much water will cover the olives by a few inches, reserve some of the water to make your lye solution. For example, I used 7 quarts of water, estimating that one more quart was needed to cover the olives. So, I reserved one quart to mix the lye. To mix the lye, I wore gloves, long sleeves, pants, and a bandana wrapped around my nose and mouth.
5. I used granular lye at the rate of 3 TBS per gallon. Since 8 quarts equal 2 gallons, I mixed 6 TBS of lye into the quart jar of water. Be sure to stir gently to dissolve the lye, and be careful of the fumes created by mixing.
6. Add the lye solution to the olives slowly. Then stir everything gently (to mix, and to avoid splashing) with a stainless steel or wooden spoon.
7. Let the olives sit for 12 hours, stirring every two hours or so.
8. At the end of 12 hours, drain off the lye. I do this in the sink, running cold water the whole time it drains. I also wear my protective gear, as described above.
9. Fish out a few large olives with your stainless steel or wooden spoon and rinse under cold water. Test for lye penetration by cutting a segment of the olive away with a knife. When lye has penetrated to the pit, the flesh should be yellowish green all the way through. In my test olives, the flesh around the pits was still whitish and milky. This meant the olives needed another round of lye.
10. Again, fill olive container with water, reserving some of the water to make the lye solution (see #4 and #5).
11. Prepare lye solution as above (see #5). (Note: UC Davis’ new curing recommendations differ from their old ones at this point. I largely followed the old ones because they had worked for me last year.)
12. Let stand for 12 hours, then drain and test several large olives. If the lye has penetrated, you’re ready to rinse (see #14). If not, a third round of lye is necessary. I felt unsure whether my olives were done, so I decided to do a third round of lye.
13. I prepared a weaker lye solution at this point, mixing 2 TBS granular lye per gallon wearing my protective gear. I let the olives stand for another 12 hours.
Leaching lye out of olives, step-by-step
14. After 12 hours, the lye test showed full penetration. I drained, then rinsed the olives twice by filling the bucket and draining it. Don’t forget to let cold water run in the sink while draining the lye.
15. After rinsing twice, I filled the bucket with cold water and let the olives stand for 12 hours. For the next 2-3 days, you drain and add cold water every 12 hours to leach out the lye. You do not have to measure the water for this step.
16. After 2-3 days, taste an olive to check for lye. Lye tastes soapy and feels soapy to the touch. When you can no longer taste the lye, you are ready for the next step. It may take up to 8 days to complete the leaching process.
17. I continued to drain and refill every 12 hours until day 6, when by taste and touch, I felt the lye had been thoroughly leached out.
18. The next steps depend on how long you wish to store your olives. We store ours in the fridge, so we follow the long-term storage recommendations, a two-step process. (You can also pressure-can them.)
Brining for long-term storage
Step 1: Medium brine
18. For long-term storage, the olives first undergo a weeklong soak in a medium brine. This prevents them from wrinkling during the strong brine. I gently pour my olives into the sink for a final rinse of water and cull any that have fallen apart, have sunken or discolored soft spots, or look otherwise ‘suspicious.’ I add warm water to my bucket (using the water measurement for the lye treatment; see #3) and make the brine by mixing 3/4 cup pickling salt per gallon of water. Then I add back the olives. They sit like this for 7 days.
Step 2: Strong brine
19. After 7 days, the medium brine solution is poured off and replaced by a stronger brine – 1 1/2 cups of pickling salt per gallon of water. The olives steep in this for 10-12 days, before the final brine.
Final brine for refrigerator storage
20. I poured off the strong brine and prepared a final brine for the olives, again at a rate of 1 1/2 cups of salt per gallon of water. I store olives in mason jars, so I pack the olives in the jars, then pour this brine over them, covering them completely. Then they go into the fridge. UC lists ‘long-term storage’ as ‘2 months or less.’ We have stored our olives in the fridge for up to a year without any problems.

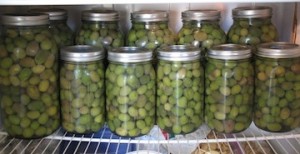
Olives hogging the fridge, stored in 2-quart/half-gallon and 1-quart jars. Ok, maybe next year I’ll pressure can them.
Eating the olives (!)
21. Before eating, soak the olives in plain water for about 24 hours to leach out the salt. Refreshing the water once or twice during this time helps, but isn’t necessary. You may leach for more time or less, depending on how salty you want your olives. Taste after about 12 hours and take it from there.
Enjoy!
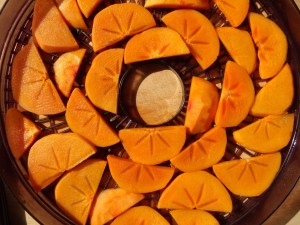
 Our favorite way to eat fuyu persimmons is dried. They have a sweeter, nuttier, all-around richer flavor than fresh persimmons. Starting in mid-October, we pick boxes of persimmons, and I fire up my crotchety dehydrator and start slicing fuyus. This year, we have branched out in two ways.


