Category Archives: Bees

September and October Garden Harvests

I present to you the last two month’s harvests–minus several gallons of honey that have yet to be tabulated!

We’re often a bit flummoxed trying to make sense of why certain crops do wonderfully one year and very poorly another year. This summer’s winners included cantaloupes and eggplant. The potatoes did horribly, as did the zucchini.

September

  • Apple ‘Golden Delicious’: 3.5 lbs.
  • Basil ‘Aroma 1’: 9.38 lbs.
  • Bean ‘Kentucky Blue’: 9.25 lbs.
  • Beet ‘Pacemaker III Hybrid’: 8.13 lbs.
  • Bell pepper ‘Big Red Beauty’: 1 lb.
  • Carrot ‘Nantaise’: 1.75 lbs.
  • Cucumber ‘Bushy Pickling’: 6.25 lbs.
  • Cucumber ‘Fountain’: 2 lbs.
  • Eggplant ‘Rosa Bianca’: 4.75 lbs.
  • Eggs: 71 (Barred Rock 19; Ameraucana 25; Welsummer 27)
  • Kale ‘Winterbor’: .25 lbs.
  • Cantaloupe ‘Minnesota Midget’: 5.38 lbs.
  • Onion ‘Red Amposta’: 2.75 lbs.
  • Parsley ‘Dark Green Italian Plain’: .38 lbs.
  • Pepper ‘Early Jalapeno’: 1.25 lbs.
  • Potato ‘Red Pontiac’: .25 lbs.
  • Potato ‘Yukon’: .75 lbs.
  • Thai Basil: .06 lbs.
  • Tomatillo ‘Variety?’: 1 lb.
  • Tomato ‘Early Girl’: 7.63 lbs.
  • Tomato ‘Pineapple’: 5.13 lbs.
  • Tomato ‘San Marzano’: 2 lbs.
  • Zucchini ‘Variety?’: 1.25 lbs.

Total: 74.09 lbs.

October

  • Beeswax: 5 lbs.
  • Cucumber ‘Bushy Pickling’: 1.25 lbs.
  • Eggplant ‘Nadia’: .63 lbs.
  • Eggplant ‘Rosa Bianca’: 3.13 lbs.
  • Eggs: 55 (Barred Rock 13; Ameraucana 19; Welsummer 23)
  • Navel orange: .13 lbs.
  • Onion ‘Red Amposta’: .25 lbs.
  • Parsley ‘Dark Green Italian Plain’: .125 lbs.
  • Pepper ‘Big Red Beauty’: 4.13 lbs.
  • Pepper ‘Early Jalapeno’: 4.13 lbs.
  • Persimmon ‘Fuyu’: 9.5 lbs.
  • Persimmon ‘Hachiya’: 94.45 lbs.
  • Pomegranate ‘Wonderful’: 1.5 lbs.
  • Tomatillo: 2.75 lbs.
  • Tomato ‘Early Girl’: 6 lbs.
  • Tomato ‘Orange Roma’: .75 lbs.
  • Tomato ‘Pineapple’: 2.5 lbs.
  • Tomato ‘San Marzano’: 1.88 lbs.

Total: 138.12 lbs.

2014 harvest total: 715.9 lbs.

2014 egg count: 385


The first two pomegranates  from our little tree were absolutely delicious!

The first two pomegranates from our little tree were absolutely delicious!

Nightly raccoon family raids led us to harvest the Hachiyas early. They're ripening nicely in the kitchen, and Kelly will soon brew up a batch of persimmon beer.

Nightly raccoon family raids led us to harvest the Hachiyas early. They’re ripening nicely in the kitchen, and Kelly will soon brew up a batch of persimmon beer.

Late-season tomatoes and tomatillos.

Late-season tomatoes and tomatillos.

Pomegranates, 'Rosa Bianca' eggplants, and jalapeño peppers.

Pomegranates, ‘Rosa Bianca’ eggplants, and jalapeño peppers.

Introducing Spoon Farm

DSCN0046

Is it a garden, or a farm? Who cares either way?

We used to think of what we have here as a garden, because it’s tiny—less than a quarter acre—and decidedly suburban. But lately, our thinking has begun to change. It’s not just the fact that so much of what we eat comes from this scrap of land we cultivate, or that we’ve moved beyond veggies, to include chickens and bees. There’s also power in naming, and in the identities we choose.

I was pleasantly surprised to learn recently that the USDA defines a farm as ‘any place from which $1,000 or more of agricultural products were produced and sold, or normally would have been sold, during the year.’ Whether or not we sell it, we are certainly producing (and consuming!) well over $1,000 in agricultural products every year. More on this next year, when I hope to finally buckle down and track the dollar value of our production.

Other definitions of ‘farm’ are even more inclusive, ranging from ‘a tract of land devoted to agricultural purposes,’ to ‘a plot of land devoted to the raising of animals, especially domestic livestock.’

Check, check, and check.

So it’s a farm, this place where we sweat and grumble and search for moments to pause and enjoy the literal and figurative fruits of our labor, and the unselfconscious beauty of flora and fauna minding their own business. It’s pleasing to stand looking out at what right now is the ramshackle, top-heavy, last burst of summer crops and to say, this is Spoon Farm.

We sold honey for the first time a few months ago at the San Mateo County Fair and came up with our name then. Kelly made a first round of labels, and on a whim recently, I made a farm website. Check it out at www.spoonfarm.com!

Late summer veggies.

Late summer veggies.

DSCN0042

DSCN0045

Winter babies ready in the greenhouse.

Winter babies ready in the greenhouse.

May Garden Harvest

May Harvest totals
  • Beeswax: 1 lb.
  • Beet ‘Pacemaker III Hybrid’: 2.75 lbs.
  • Blueberry ‘Misty’ and ‘Sunshine Blue’: .19 lbs.
  • Broccoli ‘Umpqua’: 1.88 lbs.
  • Cabbage ‘Parel’: 1.5 lbs.
  • Carrot ‘Mokum’: 4.63 lbs. (root)
  • Carrot ‘Mokum’: 2 lbs. (tops)
  • Carrot ‘Nantaise’: .63 lbs. (root)
  • Carrot ‘Nantaise’: .25 lbs. tops)
  • Carrot ‘Napa’: 6.5 lbs. (root)
  • Carrot ‘Napa’: 3.5 lbs. (tops)
  • Cauliflower ‘Snow Crown’: 7.75 lbs.
  • Chard ‘Rainbow’: .75 lbs.
  • Eggs: 37 (Barred Rock 23; Barred Leghorn 14)
  • Elephant garlic: 3.75 lbs.
  • Fava ‘Broad Windsor’: .25 lbs.
  • Garlic ‘Duganski’: 1.25 lbs.
  • Garlic ‘Spanish Roja’: 2 lbs.
  • Garlic ‘Susanville’: 1.38 lbs.
  • Honey (comb): 9.25 lbs.
  • Honey (extracted): 34 lbs.
  • Kale ‘Fordham Hook’: .5 lbs.
  • Kale ‘Winterbore’: .38 lbs.
  • Lemon ‘Meyer’: .75 lbs.
  • Lime ‘Bearrs’: .25 lbs.
  • Loquat: 8 lbs.
  • Mulberry ‘Pakistan Fruiting’: 3.25 lbs.
  • Navel orange: 3.31 lbs.
  • Onion ‘Red Amposta’: .88 lbs.
  • Onion ‘Yellow Granex’: 24.5
  • Raspberry ‘Autumn Bliss’, ‘Autumn Britten’, and ‘Tulameen’: 4.75 lbs.
  • Snap pea ‘Sugar Snap’: 1.13 lbs.
  • Strawberry ‘Seascape’ and ‘Albion’: .75 lbs.

Harvest total: 133.66 lbs.

2014 harvest total: 360.64 lbs.

Birth and Death

Death

Earlier this week the city cut down an old Valley oak in our neighborhood. It’s a tree I walked past as a child and one that I have always loved. Turns out it was well over 350 years old. I know, of course, that there are plenty of species that live far longer than this, but somehow I can’t get over the fact that a tree in the place I call home grew up in the 1600s, that it shaped this landscape even as the land around it went from open oak savannah to suburban lawns and asphalt.

Lawns and asphalt, incidentally, are probably what compromised its health to the point that, even with all its vibrant spring growth, the city felt the need to limit liability and cut it down.

Kelly and I sat on the curb under its leaning trunk and talked to it in our hearts the night before it died. We went back the next afternoon and touched the great, oozing rounds of it that the city left behind. And we pulled out soft white sponges of oak root fungus (Armillaria mellea) from the tree’s core and smelled the yeasty sweetness.

We are lucky. There are probably dozens of giant old Valley oaks in our immediate neighborhood. They are stunning and majestic, and they are holy to me. Most of them are planted in the middle of irrigated lawns, or crowded next to sidewalks and driveways. There aren’t many young trees, at least not ones that will have space to grow.

I have watched the Valley oaks slowly going over the course of my small human life, taken out by the city or falling on their own. It has always nagged at me that there is no longer space in this suburban landscape for Valley oaks to thrive and reproduce.

But there’s something about losing the tree this week that has lit a fire in me and broken my heart, all at once. Maybe I will nag the city to start replanting trees from local stock. Maybe I’ll go door to door imploring neighbors to stop irrigating lawns at the bases of these drought resistant trees, to take out paving, to make space.

Death

The second death this week is also heartbreaking. Kelly and I went outside today and noticed that no bees were flying into Mondo, our beloved three-year-old top-bar hive. We got underneath and looked up through the screened bottom with a headlamp. There were a handful of zippy, agitated bees, but no group in sight, no rumbling hum of a healthy hive.

As usual, Mondo built up beautifully this spring. They swarmed at least once last month. All we can figure is that their new virgin queen got lost on her mating flight.

Of course, we could always be wrong. Perhaps they swarmed a few more times when we weren’t looking and are still waiting for the new queen to get up and running. But it doesn’t look good, and we’re fairly certain they’re gone.

We have other great bees, but Mondo’s line was our favorite and our longest-lived survivors. To make matters worse, Juniper, Mondo’s first swarm from last year, is our only other hive from this lineage, and she isn’t looking great. Although she built up well coming out of winter, we’re not aware of Juniper swarming yet, and she seemed to slow way down in March. There is a pile of dead bees in front of Juniper that we think have deformed wing virus.

Birth

About an hour after discovering Mondo’s troubles, we got a call from some friends who live just two blocks away. They reported that there was a swarm in their front yard, and asked if we wanted it. We jogged over in our bee suits, and there it was: a beautiful, mellow, good-sized swarm about three feet off the ground in a shrub.

This never happens to us.

We are used to swarms high up in trees on perilous branches. We’re used to swarms with eight queens and thousands of worker bees that can’t figure out where their allegiance lies. We’re certainly not used to swarms that march docilely into a box that you place just below them.

Even Kelly, who has sworn off beekeeping with all of its stresses and unpredictability, was excited about this swarm. We wondered whether there’s a little bit of Mondo’s genetics in these bees, or if they came from the cavity in the old Valley oak that stands next to the one that was cut down. We wondered if they are exactly what our hearts need.

DSCN0028

DSCN0029

DSCN0033

What Do You Need to Make a Walk Away Split?

There are lots of approaches to dividing honey bee colonies. Our favorite is walk away splits. This method is cheaper and less complicated than purchasing or raising a queen to introduce. But the real reason we believe in walk away splits is that the bees get to select and raise their own queen.

In all aspects of our beekeeping, we attempt to meddle as little as possible in the life of the colonies, and we endeavor to cultivate locally adapted bees that are better at taking care of themselves without treatment or other human support/interference.

Walk away splits are simple (in theory) and give the bees a break in the reproductive cycle, and thus also a break from varroa mites.

The beekeeper’s only role in a walk away split is to transfer frames from the original hive into new boxes. The bees do the rest of the work. The key to this type of hive division is timing and ‘ingredients.’ In the ten minutes it takes the beekeeper to transfer frames from a strong hive into a new box, she must choose frames that contain key components and arrange them in such a way as to make it easier, not harder, for the new colony to raise a strong queen.

So what do bees need to raise a good queen?

 Eggs

Bees need eggs from which to raise a queen. The difference between a worker bee and a queen bee is a matter of nutritional variation early in development. All young larvae are fed royal jelly, but worker bee larvae are fed less royal jelly for a shorter period of time than larvae being raised for queens. It is safest to select frames containing eggs for the bees to rear a queen, rather than try to gauge the age of the larvae you see (since very young larvae can also be raised into queens with the right nutrition). By making sure the frames you choose for the split contain eggs, you guarantee that the bees will be able to select larvae of the correct age from which to raise queens.

Phew—what a mouthful!

A new split doesn’t need very many eggs for the bees to raise a queen. In fact, avoid including frames with lots of eggs or open brood, as this will force the bees to feed and care for many babies. Ideally, they should put most of their energy into caring for the developing queen or queens they are raising.

One frame of capped brood with a small patch of eggs is perfect for a walk away split.

Nectar

Excellent nutrition is critical to the survival of a young split.  Because most of the bees on frames of brood are young nurse bees, the new split will not have a strong group of foragers for some time, and it’s important that there is food in the split for the bees to survive on in the beginning. Nectar is an important nutritional component, so make sure it is plentiful in the split. Although honey works too, I have heard that including frames with curing nectar is even better where raising baby bees is concerned.

Two or three frames containing a combination of nectar and pollen should be sufficient for a walk away split. These important frames of food should be placed facing the frame with eggs, so that food sources for the young queen and her attendants are close at hand.

Pollen

Pollen contributes protein to a bee’s diet. Again, nutrition is key. If it’s possible to find frames with both nectar and pollen together, this is best.

Capped brood

Think of capped brood as future workers. Capped brood doesn’t need to be fed and tended to like bees in the larval (uncapped) stage of development. Capped brood is less labor and resource intensive for the nurse bees in the new colony. At the same time, it ensures that there will be an influx of young bees to the colony’s workforce within 13 days.

One or two frames of capped brood should be sufficient for a walk away split. All the brood should be together in the middle of the box. More capped brood can be added to make a stronger split.

Nurse bees

Hive divisions need lots of nurse bees. Again, the developing queen should have all the attention and care she requires, and the capped brood must be kept warm. Nurse bees are also more likely to stay in the new hive, rather than returning to the mother colony (which is often only a few feet away). No matter how many older foragers you add to a new split, they will find their way back to the original hive if it is close by. This is because, unlike nurse bees, foragers have already gone out into the world and oriented to the original hive’s location.

Select nurse bees by adding frames of capped brood (and a few eggs!) that are covered in bees. The bees in the brood nest should primarily be nurse bees. Because they are younger than foragers, nurse bees tend to be smaller.

Honey

We generally prefer not to supply our bees with sugar syrup feed, though this is often recommended for new splits. Instead, you can include an extra frame of honey to feed the bees until nurse bees have graduated to foragers.

How many frames to include in a split

We generally aim for at least five frames total in a walk away split (including a few frames of brood, and a few of pollen, nectar, and honey). We aim to include enough bees to cover these frames, keeping in mind that bees on frames of food stores may not be nurse bees and will probably return to the original colony.

If you want to add additional nurse bees, you can remove extra frames of brood from the mother hive and shake the attending bees into the new split. You can also always add extra frames of capped brood (covered in bees) to bolster the split’s population down the line.

Check out this post on how to tell when a hive is ready to split, or read about our first hive division last year, and splitting a hive the same day that it swarmed last spring.

Gauging Honey Bee Colony Readiness for Walk Away Splits

What makes a hive ready to divide, and how can you, the beekeeper, tell? Here’s what I go by when deciding if one of our hives is ready to split and ready to raise its own queen. And, if any of the beekeeping jargon below has your head spinning, take a look at our illustrated glossary of beekeeping.

Population

Is the hive ‘booming’? I look for bustle at the hive entrance, including bees orienting, bees arriving at the entrance with pollen, and a generally busy, productive vibe. Removing the outer cover, I look to see if there are bees visible (teeming, even) at the inner cover’s opening. I check out how the bees’ population seems within the hive. Are the frames covered in bees? Are the boxes full?

A good strong population in and of its self doesn’t mean the hive is ready to divide, but strong numbers are a must for making a walk away split. After a divide, both the mother colony and the new split(s) need to have plenty of bees to rebuild and raise a queen.

Nectar flow

If there’s lots of new, pearly white wax in the hive and bees tending to curing honey, there is a nectar flow in progress. This bodes well for hive divisions, as it means food is plentiful. Proper nutrition is essential for the bees to be able to raise a strong new queen.

Of course, it’s entirely possible to have a nectar flow on and a hive that’s not at all ready to divide. But I would hesitate to divide a colony if I don’t see signs that the bees are finding good forage and that they are currently supplied with stores to raise a queen.

Drones

The presence of drones and drone brood within the hive generally indicates that the colony is in its reproductive phase. An exception to this is hives in which there is a drone-laying worker (this can happen when the colony lacks a queen and a worker bee begins laying unfertilized eggs). In this case, all of the brood will be drone brood—not a good sign.

In spring, in a healthy colony, the queen will begin laying some drone brood before the hive swarms. If it’s spring, and you find drones milling about in the hive and patches of drone brood on the frames, the colony is in the process of reproduction.

Capped brood

Look for a ratio of about 90% capped brood to 10% uncapped brood in the hive. This is a sign that it is definitely time to divide the hive.

Before the colony makes its final preparations for swarming, the queen’s egg production slows. The bees are actually putting her on a diet to lose weight so that she will be able to fly with the swarm when it leaves the hive. Another benefit to the slowed egg production is that capped brood is less work for the remaining bees after a swarm to care for. Since the colony remaining in the hive after a swarm has its population cut by about half, the bees can put their energy into raising a strong new queen—not feeding uncapped worker bee brood.

Queen cells

This can be an obvious sign that the colony is reproducing and will soon, or has already, swarmed. It’s also possible the colony is in the process of replacing a failing or dead queen, rather than at the height of its reproductive vigor.

If you see queen cells, check out the above indicators to confirm preparation for swarming. Also note where the queen cells are positioned on the frame. Cells along the bottom edge of the comb are more likely swarm cells, while queen cells scattered in the middle of frames are often supersedure, or queen replacement cells.

It’s also worth looking to see if you can find eggs in the hive when you see queen cells. If eggs are present (and the brood isn’t all drone) you know that the queen has been in the hive within the last three days.

Also note what stage of development the queen cell is in and how much attention the bees are paying to it. If the bees aren’t milling around over the cell and looking like they have important business to attend to, it’s likely the queen isn’t viable, or that this is an old, un-hatched queen cell. If the bees are attending to it, you should too.

The presence of viable capped swarm cells is a definitive sign that the hive has already swarmed, or that it is about to.

Case study

I inspected one of our strongest hives on March 8th.  This is a colony that is seriously booming. The bees overwintered with four deep bee boxes, and we added a fifth in late February. That fifth box was teeming with bees on March 8th and was full of brood, capped honey, pollen, and nectar.

Mid-inspection, before adding the sixth box on March 8th.

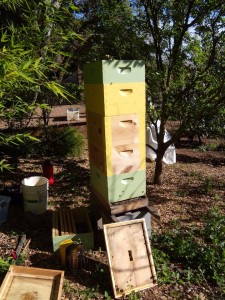
The hive last year with a honey super on top. My camera ate my recent inspection photos.

I had come prepared to divide the hive, based on its huge population. I worked my way halfway through the fifth box and considered my Is the colony ready to split? mental checklist.

Population, check. Nectar flow, check. Drones, half-check (I saw a handful of drones, as well as a handful of drone brood cells, capped and uncapped). Capped brood, no check. There was certainly capped brood, but it was nowhere near 90% of the brood I saw. I also didn’t see any queen cells.

For the record, I actually prefer to split before the bees start raising a queen. Handling frames with capped queen cells entails a risk of damaging the queen. Also, once there are queen cells, it may be too late to prevent swarming, as the first swarm may have already left with a large portion of the colony’s population.

Based on the capped brood ratio, I decided the colony wasn’t quite ready, but I thought they were close. Because of the nectar flow and the prodigiously laying queen, I added a sixth box for the colony to move into and resolved to return in a week for another inspection.

It’s amazing how different a hive can look from one week to the next when it is ramping up in spring. I ended up splitting the hive today, and am second-guessing some of my decisions, but I’ll save all that for my next post.

Homemade Honey Orange Marmalade

When we began harvesting navel oranges in earnest last month, I canned orange marmalade for the first time. The recipe is from our third edition copy of Stocking Up (1986), by Carol Hupping and the staff of the Rodale Food Center.

I was drawn to this recipe for its simplicity. Of the four ingredients, only the water wasn’t ‘local’ (i.e. from our own garden). The book calls it Bitter Orange Marmalade, and it is indeed quite bitter due to the inclusion of all of the fruit peel in the recipe. Maybe next year I’ll try a more traditional, sugary marmalade recipe, but overall I’m pleased with this one.

As I’ve mentioned before, I always hesitate somewhat to share recipes for canned goods. Please proceed at your own risk, and read up on canning safety at the website for the National Center for Home Food Preservation. The USDA offers a Complete Guide to Home Canning there. You can read about botulism on the CDC website. If you don’t feel comfortable canning, or have safety concerns, you can always make recipes to freeze or store short-term in the refrigerator.

Marmalade ingredients

  • 5 oranges
  • 2 lemons (I used Bearrs limes)
  • 3 cups honey
  • 12 cups water

Directions

  • Measure water into a large pot and add whole oranges and lemons or limes
  • Bring to a boil, then reduce to a simmer and cook for two hours
  • Saving remaining water, remove fruit, quarter it, and remove seeds
  • Chop fruit and return it to water
  • Bring fruit mixtures to a boil and add honey
  • Return mixture to a rolling boil and stir constantly for 15-30 minutes, or until the mixture has the consistency of a thick syrup (I had to stir and boil for about 45 minutes)
  • Leaving ¼ inch head space, pour marmalade into scalded half-pint jars and process for 10 minutes in a boiling water bath
  • Let the marmalade ‘age’ for at least two weeks before digging in

Enjoy! After dutifully waiting the recommended two weeks, we popped a jar open and started snarfing. I’ve been eating orange lime marmalade by the spoonful!

Yum!

Yum!

2014 Garden Resolution #2: Mastering Hive Division

Last spring I split two beehives. The results were mediocre. In one case, the mother colony failed to raise a new queen, while the daughter colony raised a veritable egg-laying machine. In the other case, the mother colony raised a viable queen, while the daughter colony ultimately became drone-laying. In both cases, I had to recombine the hives, so ended up with the same number that I started with and a lot of wasted time.

I’m not sure what went wrong with my hive splits, though I do wonder if several horribly timed weeks of vicious wind may have interfered with successful mating flights for the virgin queens.

Though I dutifully followed my hive splitting instructions, I am also more than ready to assume responsibility for the failed splits. Both hives had closed queen cells at the time I split them, and one had swarmed earlier that day. My timing for splitting the hives may not have been good, and my technique was quite possibly flawed.

The resolution…

This is all longwinded background to get to the second of this year’s garden resolutions. This spring, I will increase my number of hive divisions and hone my colony splitting skills.

Aside from a nifty beekeeping trick to acquire, I think mastering the art of beehive division is an essential part of becoming a self-sufficient beekeeper, as well as strengthening the stock in our apiary.

There are many, many reasons we have sworn off commercial honey bee packages (more on this another time). Swarm capturing, swarm luring, and hive division are three much better alternatives for populating the bee yard.  But as much as I love the thrill of climbing the extension ladder to collect our top-bar hive’s fifth swarm of the season (no really, I do!), dividing our best colonies when they are ready to swarm is more efficient and likely to give us more bees at the end of the day. It’s also a safer bet in terms of neighbor relations; there’s nothing like a cloud of bees eclipsing the sun to get people nervous.

Walk away splits, my hive division method of choice, involves much more than just throwing some bees, eggs, honey, and pollen into a new box and waiting for the nurse bees to raise a queen. It’s also about reading the mother colony, watching the ratio of open to closed brood, understanding when the bees are ready to begin swarming preparations, organizing the frames in the new split so that the bees have easy access to the resources they need to raise a strong queen, and much more.

In the moment, sweating in my bee suit and squinting at frames trying to spot eggs (while also trying not to chill the brood), I’m not always as centered or intentional as I’d like to be. I forget things I’ve read that seemed important. I second-guess myself. I fret.

Does practice make perfect? I doubt it, but I’ll see this spring. And I’ll try hard to document and share what I learn.

If all this seemed like impossibly complicated bee lingo, stay tuned. I will keep adding to our beekeeping glossary, and I’ll try to demystify the colony division process on the blog as I practice it myself.

During a short break in the long-awaited rain today, we looked out the window and thought for moment this hive was about to swarm (yikes!!!). No swarms, but the bee traffic jam reminds us that our colonies' populations are ramping up.

During a short break in the long-awaited rain today, we looked out the window and thought for moment this hive was about to swarm (yikes!!!). No swarms, but the bee traffic jam reminds us that our colonies’ populations are ramping up.

2014 Garden Resolution #1: Improved Garden Record Keeping

Happy New Year to gardeners and gardens everywhere! I have two gardening resolutions for 2014. First: improved record keeping.

DSCN0561

Keeping garden records

This year, I aim to faithfully record all of our planting and harvesting, as well as calculate the approximate monetary value of the harvest. The idea of keeping gardening records delights me (no, really, I’m weird like that). Unfortunately, despite my best intentions over the years, our garden records remain mediocre at best.

As I explained in a garden record keeping post almost two years ago, we (usually) keep track of our planting and harvesting using a binder method I developed after interning on a small organic farm/CSA. In theory, these records are quite detailed, including date sown, vegetable variety, quantity sown (and age of seeds), number of plants to emerge, the bed in which they are planted, transplant date, units harvested/pounds harvested, date of harvest, and a section for additional notes. Ha!

Many other food gardeners and small-scale farmers make a point of keeping careful records and tallying money saved. Their blogs inspire me toward better self-discipline, and I am grateful to them for reminding me that really good record keeping is not only ideal, but also possible. Thomahaak Family Farm keeps fabulous records of produce harvested (right down to herbs weighing fractions of a pound).  I appreciate Dog Island Farm’s tally of both farm savings and expenditures. Starving off the Land has gone so far as calculating calories harvested, setting goals for the percentage of household caloric need met by first-hand food.

Recording small harvests

Aside from lack of consistency in actually writing things down, one of the most challenging aspects of garden record keeping for me is the fact that we often harvest very small quantities of veggies and herbs. If, as occurred yesterday morning, I wander outside in my pajamas to pick a few sprigs of parsley, a small bunch of cilantro, and about five leaves of kale to throw into a smoothie, how do I effectively and efficiently record this?

It was January 1st; my resolve was brand new, and I had nowhere to rush off to. Under Kelly’s skeptical eye, I got down the small kitchen scale and attempted to weigh the bounty. The parsley and cilantro each weighed in at approximately 1/32 lb. The kale was more like 1/16 lb. That’s if I trust my scale—an old, non-digital thrift store find.

Kelly pointed out that she doesn’t see how keeping these kinds of records actually benefit our gardening efforts. She also informed me that she was not prepared to follow my example. She suggested that employing a rougher estimate of our planting and consumption habits still allows us to adjust future planting accordingly, without going off our gourds trying to weigh every sprig of parsley.

I see her point.

Still, I am moved to redouble my record keeping efforts and to experiment with how to do this in a sustainable and useful manner.

Keeping records for smarter gardening

I would argue that good garden records make for smarter gardening. It’s easy to implement changes in the garden when you have the facts in front of you. We have adjusted the varieties of onions we grow based on our yearly yield. This is possible because we weigh the harvest every spring and compare varieties. If we tally money saved on produce grown at home, we can make smarter choices about how to prioritize space in our veggie gardening beds.

Record keeping can also serve as justification to ourselves for how we allocate our time and resources. I grow food for many reasons—not all of them rational. But record keeping can illustrate the good, solid, sensible reasons to grow food. It can provide us with data and supportive evidence for the difference our gardening efforts make in our diet and budget.

I can promise right now that this year’s records won’t be perfect, but I will experiment to improve our system and our consistency. In the first two days of the new year, I’ve started jotting records on our 2014 calendar. I think this method will be especially useful for tracking eggs—an almost daily harvest. I am also considering creating standardized measurements for certain common small harvests. For example, knowing the weight of the small bunches of cilantro, parsley, and kale I add to our smoothies, I may record these harvests as ‘small bunch cilantro,’ rather than weighing each bunch.

How do you keep your garden records? And why do you keep them (or not!)?

Honey Harvest, Winter Preparations and Follower Boards

As I mentioned in my post ‘Fall Blooming Plants for Bees,’ there wasn’t much honey to harvest this fall because our summer nectar flow occurred earlier than usual. In fact, I only took ‘extra’ honey from two colonies out of seven. While four others have some curing nectar and capped honey, they do not have the recommended 3-4 frames of capped honey, and I wonder if they will starve this winter.

It’s tempting to start feeding, but we have adopted the ‘natural selection’ view of beekeeping. The more we interfere, the more we facilitate the propagation of bees that require help to survive. We would rather propagate bees that can adapt to whatever conditions present themselves. Last year, we had one hive with zero stores going into winter that survived. In our climate and in the suburban locales where we keep our hives, the bees can find forage nearly year-round, if it’s not too cold to fly.

The Farmer’s Almanac calls for a bitterly cold winter this year, but the Almanac has been wrong for the last few years. We’ll keep our fingers crossed.

Four of the six hives I inspected through September had excellent populations, and two in particular had excellent brood patterns. Two of the colonies may ultimately dwindle. One had abandoned half of box two to wax moths, and I performed a massive clean-up job. The other seemed abnormally agitated, and their numbers seemed a little small.

I finished rearranging and condensing all the hives by mid-October.

With the use of follower boards, we’ve taken advantage of the ability to condense hives vertically rather than horizontally. For example, we had a small colony last fall that we could have condensed to one brood box, with 10 frames. Instead, we condensed to two brood boxes, with 6 frames each, under the assumption that a small cluster would be more able to move upward to their stores as a group, rather than disbanding to access stores on the outer edges of a box.

Follower boards have the added advantage of allowing for easier frame manipulation. When inspecting a hive, you remove one follower board and about 2″ of space opens up. The common configuration is 8 frames sandwiched between 2 follower boards per 10-frame box.

A standard 10-frame Lang box, with 8 frames sandwiched by follower boards.

A standard 10-frame Lang box, with 8 frames sandwiched by follower boards.

For those who haven’t heard of follower boards, they are essentially solid frames. When I made them with a beekeeping friend, we used tongue-in-groove planks cut vertically to size (mediums or deeps). We also cut to size a strip of wood that acted as the top bar, and screwed it into the sections of wood. The ones I buy are made of 1/2″ plywood with solid wood top bars.

Homemade follower board, top; store-bought follower board, bottom.

Homemade follower board, top; store-bought follower board, bottom.

In addition to allowing for a wider variety of hive configurations and making frame manipulation easier, Serge Labesque asserts that follower boards promote air circulation. In theory, air convects upwards from the entrance and screened bottom board between the outermost frames and follower boards and exits through the inner cover out of the nest. Excess moisture is transported out of the hive via this airflow. Further, the space between the outermost frames and follower boards has an insulating effect, protecting the brood nest from extreme heat in summer.

Beekeeping still remains much of a mystery to me. We continue to find whatever balance we can between caring for our bees and interfering with them as little as possible. We want healthy bees, but we don’t want the responsibility to be solely ours. In our struggle, we hope we are helping the bees become stronger.